I had previously followed the r/roguelikedev summer tutorial series, but never finished. I tried again this year (2020), using rot.js[1] this time, and finished. 🎉
Source code: game.html + roguelike-dev.js (no build step) - and on github[2].
My goal is not to implement my own features, but instead focus on only the features from the Python + tcod tutorial, implementing them in JavaScript + browser + rot.js instead. I’m willing to implement the data structures, code style, etc., differently from the tutorial to better fit JavaScript and my own coding style. However, every time I think of a game feature I’d like to add or do differently, I add it to a text file somewhere, and then I can come back to it after I finish the tutorial.
1 Drawing the ‘@’ symbol and moving it around#
I’m going to follow the Roguelike Tutorial for Python[3] (2019 version, not the 2020 version, for various reasons) and adapt it for rot.js[4].
1.1 Setup#
Part 0[5] of the tutorial covers setting up Python and libtcod. I’ll instead set up rot.js.
HTML:
<figure id="game"></figure>
<script src="third-party/rot.js"></script>
<script src="game.js"></script>
Javascript:
const display = new ROT.Display({width: 60, height: 25});
document.getElementById('game')
        .appendChild(display.getContainer());
display.draw(5, 4, '@');
Set the fontFamily property if you want to override the default browser monospace font. For example, fontFamily: "Roboto Mono".

A warning about my coding style: I follow make it work before making the code nice. That means I’ll use plenty of global variables and hacks at first, and clean up some of them later. Don’t look at my code as an example of how to structure a program “properly”.
1.2 Key input#
Part 1 of the roguelike tutorial[6] covers setting up a screen and keyboard handler. I already set up the screen in the previous section so now I need to set up a keyboard handler. Unlike Python, we don’t write an event loop in the browser. The browser already is running an event loop, and we add event handlers to it.
There are various places to attach a keyboard event handler.
- The rot.js manual[7] suggests using an <input> element for event handlers. I decided not to do this. If that input ever loses focus, I don’t know how to get focus back. Clicking an input box is what I think of when I’m typing input text but not what I expect to do when moving around on the map.
- One rot.js tutorial[8] attaches the event handlers to the global
windowobject. I decided not to do this. There are times when I am typing elsewhere on the page (typing into the site search box, or adding a comment, or maybe even in-game actions like typing my name in). I don’t want the game to treat those keystrokes as player actions.
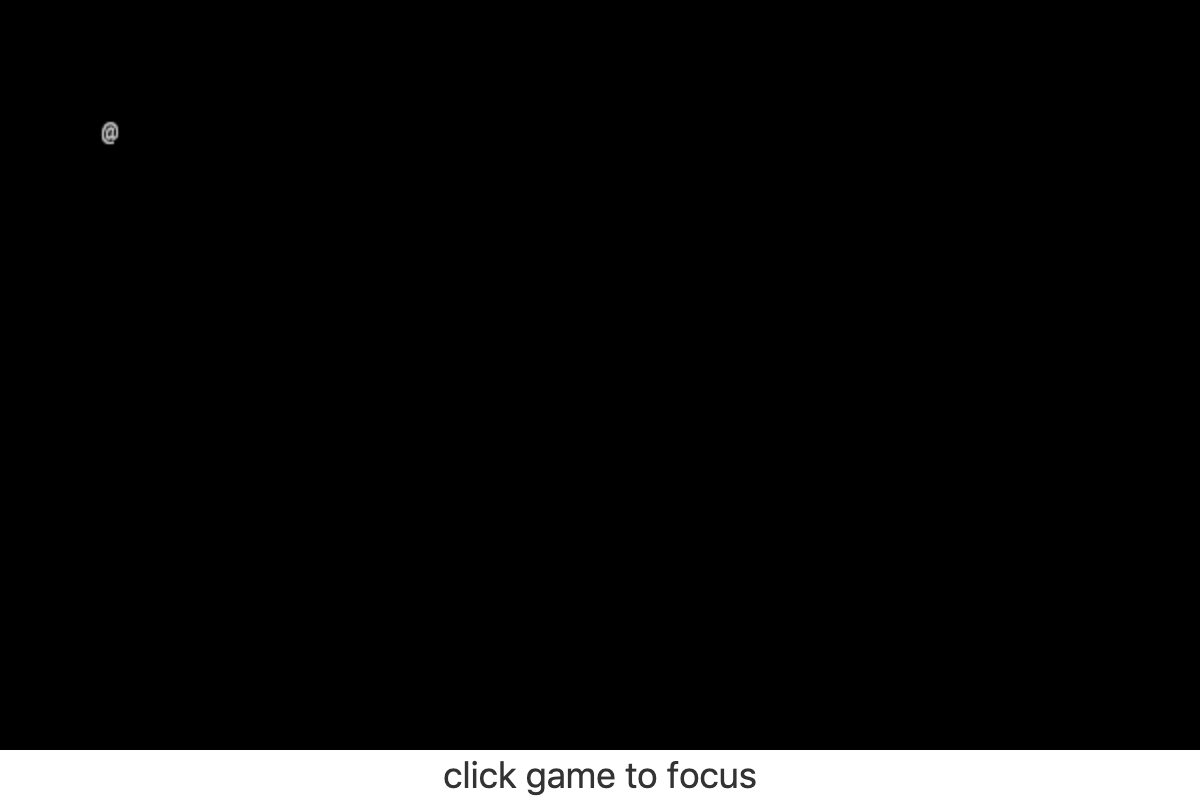
I decided to instead make the game map focusable by adding the tabindex="1" attribute to its canvas. This way, clicking on the game map will give it keyboard focus. You can click away to add a comment and then come back to the game.
Javascript:
const canvas = display.getContainer();
canvas.addEventListener('keydown', handleKeyDown);
canvas.setAttribute('tabindex', "1");
canvas.focus();
The problem is that a canvas isn’t an obviously focusable element. What happens if it ever loses focus? I decided to add a message when the canvas loses focus:
HTML:
<figure>
  <div id="game"></div>
  <div id="focus-reminder">click game to focus</div>
</figure>
Javascript:
const focusReminder = document.getElementById('focus-reminder');
canvas.addEventListener('blur', () => { focusReminder.style.visibility = 'visible'; });
canvas.addEventListener('focus', () => { focusReminder.style.visibility = 'hidden'; });
CSS:
#game canvas { display: block; margin: auto; }
The CSS is not self-explanatory. I use display: block because a <canvas> element is inline by default, and that means it has some extra space below it matching the extra space a line of text has below it to separate it from the next line below. I don’t want that so I change it from an inline element to a block element. I use margin: auto to center the canvas in the parent element.
Here’s what it looks like if it does not have focus:
The next thing I need is an event handler:
function handleKeyDown(event) {
    console.log('keydown', event);
}
I often start out with a console.log to make sure that a function is getting called.
What’s next for Part 1? I need to make arrow keys move the player around. I can’t do that yet, because I don’t have a player position.
1.3 Player movement#
I need to keep track of the player position and then change it when a key is pressed.
let player = {x: 5, y: 4, ch: '@'};

function drawCharacter(character) {
    let {x, y, ch} = character;
    display.draw(x, y, ch);
}

function draw() {
    drawCharacter(player);
}

function handleKeyDown(event) {
    if (event.keyCode === ROT.KEYS.VK_RIGHT) { player.x++; }
    if (event.keyCode === ROT.KEYS.VK_LEFT)  { player.x--; }
    if (event.keyCode === ROT.KEYS.VK_DOWN)  { player.y++; }
    if (event.keyCode === ROT.KEYS.VK_UP)    { player.y--; }
    draw();
}

draw();

Two problems:
- When using arrow keys, the page scrolls. I can fix this by adding
event.preventDefault(). But if I do that, then browser hotkeys stop working. So I need to do something a little smarter. I’m going to prevent the default only if I handled the key. - The
@character doesn’t get erased when I move. I need to either draw a space character over the old position, or I need to clear the game board and redraw everything. I’m going to redraw everything. I find it to be simpler and less error prone.
This would be a good time to mention that the rot.js interactive manual doesn’t cover all the functionality. You may also want to look at the non-interactive documentation[9] for a more complete list of methods. In this case, I looked at display/canvas→Canvas[10] to find the clear method.
Part 1[11] of the Python tutorial splits up keyboard handling into a function that generates an action and another function that performs the action. I’ll do the same.
function handleKeys(keyCode) {
    const actions = {
        [ROT.KEYS.VK_RIGHT]: () => ['move', +1, 0],
        [ROT.KEYS.VK_LEFT]:  () => ['move', -1, 0],
        [ROT.KEYS.VK_DOWN]:  () => ['move', 0, +1],
        [ROT.KEYS.VK_UP]:    () => ['move', 0, -1],
    };
    let action = actions[keyCode];
    return action ? action() : undefined;
}

function handleKeyDown(event) {
    let action = handleKeys(event.keyCode);
    if (action) {
        if (action[0] === 'move') {
            let [_, dx, dy] = action;
            player.x += dx;
            player.y += dy;
            draw();
        } else {
            throw `unhandled action ${action}`;
        }
        event.preventDefault();
    }
}

function draw() {
    display.clear();
    drawCharacter(player);
}
Ok, that’s better. It only captures keys that are being used for the game, and leaves browser hotkeys alone. And it erases the screen before drawing a new frame.
What else is in Part 1 of the tutorial?
- fullscreen toggle
- press escape to quit
I’m going to skip these two.
Note: I later changed the code from using keyCode to using key. This is a newer browser feature, and it provides a string name of the key that was pressed, handling shifted keys too. For example, keyCode doesn’t distinguish between / and ? because they are on the same key, but key will be different.
2 The generic Entity, the render functions, and the map#
Part 2[12] of the tutorial covers entities. My design differs slightly from the tutorial:
- I include only “instance” data in the entity, such as position and health, but not “static” data such as its color.
- I include an entity type string instead. Normally this is “implicit” information in that each object belongs to a class. I prefer making game classes explicit.
- I also don’t put methods in this object. I’ve had too many methods that don’t “belong” in any one class, so I prefer to leave them as free functions. My goal is to have the object serializable as JSON.
- I give each entity an id. I find that useful in debugging. It may come in handy later for serialization or events or logging.
function createEntity(type, x, y) {
    let id = ++createEntity.id;
    return { id, type, x, y };
}
createEntity.id = 0;

let player = createEntity('player', 5, 4);
Here’s an example of how this design differs from the one in the Python tutorial:
function drawEntity(entity) {
    const visuals = {
        player: ['@', "hsl(60, 100%, 50%)"],
        troll: ['T', "hsl(120, 60%, 50%)"],
        orc: ['o', "hsl(100, 30%, 50%)"],
    };

    const [ch, fg, bg] = visuals[entity.type];
    display.draw(entity.x, entity.y, ch, fg, bg);
}
Instead of storing the character and the color in the object, I store a type in the object, and then store the character and color in a lookup table. There are some scenarios where I like this design better:
- if I want to change the appearance based on its status (bleeding, poisoned, etc.)
- if I want to show another map (perhaps a sonar view) where the visuals of each entity are different
- if I save the game, and then in the new version of the game I want to change colors
- if I want to switch from ascii to graphical tiles
Ok, cool, I have a way to make entities. Let’s make a second one:
let troll = createEntity('troll', 20, 10);
Now I have to modify the drawing function to draw it too:
function draw() {
    display.clear();
    drawEntity(player);
    drawEntity(troll);
}
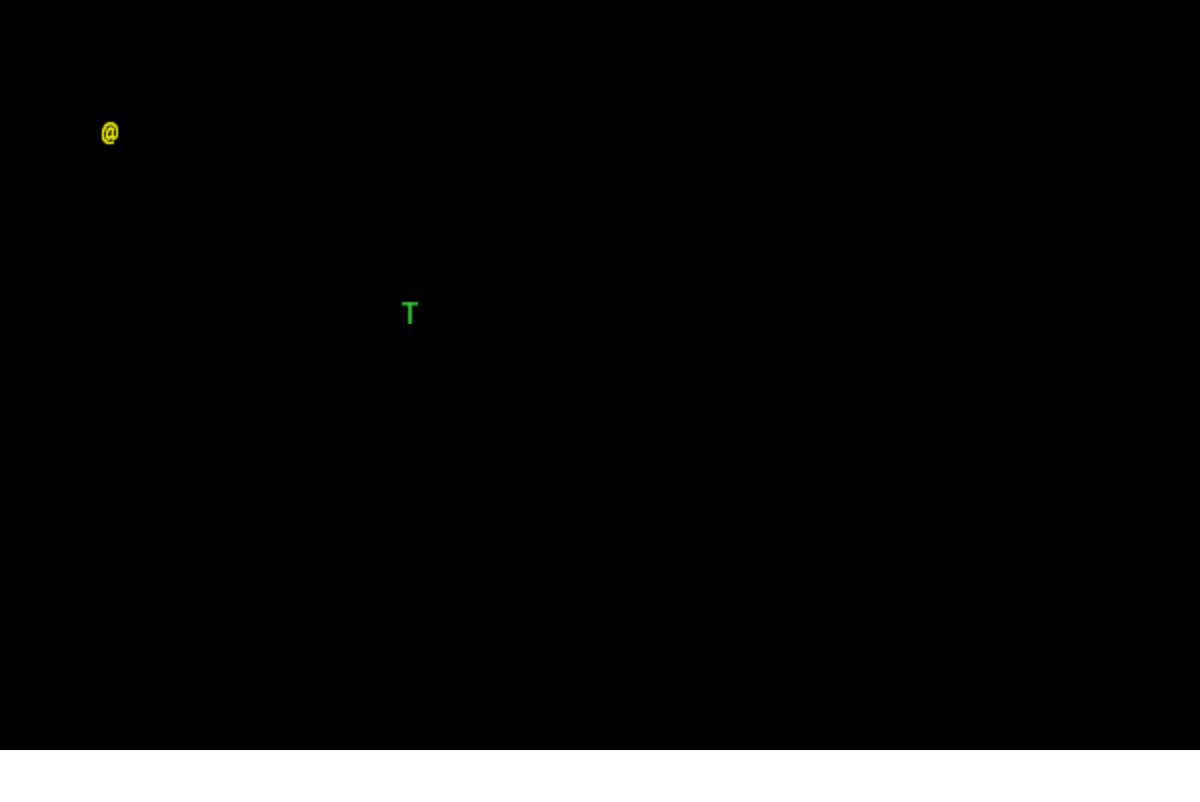
Looks good. The player and monster have different appearances.
I can’t keep adding a variable for each entity. Part 2 of the Roguelike Tutorial converts the individual entity variables into an set of entities. I was going to use an array or a Set but decided to use a Map instead.
let entities = new Map();
function createEntity(type, x, y) {
    let id = ++createEntity.id;
    let entity = { id, type, x, y };
    entities.set(id, entity);
    return entity;
}
createEntity.id = 0;
Then when I draw them, I can loop over entities:
function draw() {
    display.clear();
    for (let entity of entities.values()) {
        drawEntity(entity);
    }
}
3 Generating a dungeon#
The second half of Part 2[13] creates a map data structure, and Part 3 generates a dungeon map. ROT.js includes dungeon map creation functions so I’ll use one of their algorithms. ROT will call a callback function for each map tile, 0 for walkable and 1 for wall. I’m going to store this data in a Map, indexed by a string x,y. For example at position x=3, y=5, I’ll use a string key "3,5".
function createMap(width, height) {
    let map = {
        width, height,
        tiles: new Map(),
        key(x, y) { return `${x},${y}`; },
        get(x, y) { return this.tiles.get(this.key(x, y)); },
        set(x, y, value) { this.tiles.set(this.key(x, y), value); },
    };

    const digger = new ROT.Map.Digger(width, height);
    digger.create((x, y, contents) => map.set(x, y, contents));
    return map;
}
let map = createMap(60, 25);
The next step is to draw the map. I want to draw it first, before the player or monsters.
function draw() {
    display.clear();
    for (let y = 0; y < map.height; y++) {
        for (let x = 0; x < map.width; x++) {
            if (map.get(x, y)) {
                display.draw(x, y, '⨉', "hsl(60, 10%, 40%)", "gray");
            } else {
                display.draw(x, y, '·', "hsl(60, 50%, 50%)", "black");
            }
        }
    }
    for (let entity of entities.values()) {
        drawEntity(entity);
    }
}
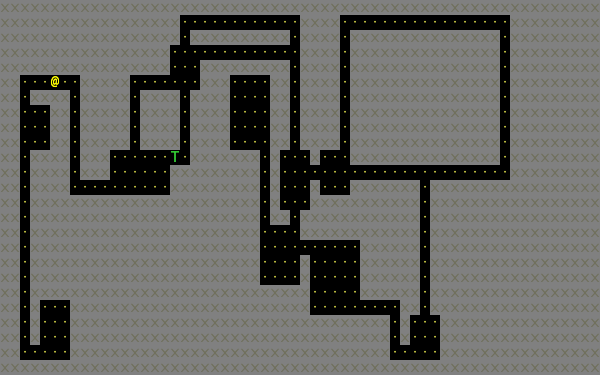
The final step is to make player movement not allow moving onto a wall. I modified the movement function to check if the map tile is 0. This is slightly different from checking that it’s not 1 in that this will automatically makes sure I don’t walk off the map, where the values are undefined.
function handleKeyDown(event) {
    let action = handleKeys(event.keyCode);
    if (action) {
        if (action[0] === 'move') {
            let [_, dx, dy] = action;
            let newX = player.x + dx,
                newY = player.y + dy;
            if (map.get(newX, newY) === 0) {
                player.x = newX;
                player.y = newY;
            }
            draw();
        } else {
            throw `unhandled action ${action}`;
        }
        event.preventDefault();
    }
}
The dungeon generation algorithm also generates a list of rooms and corridors. This might be useful later.
4 Field of view#
ROT.js includes two field of view algorithms[14]. The field of view library is fairly easy to use. The input callback lets it ask you “can you see through x,y?” and the output callback lets it tell you “there’s this much light at x,y”. I saved the results in a Map and used it for calculating the light level at any point. The Python tutorial doesn’t use the light level but maybe I’ll find something to do with it later.
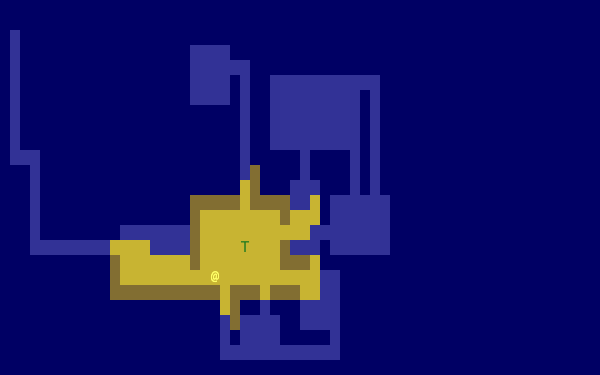
const fov = new ROT.FOV.PreciseShadowcasting((x, y) => map.get(x, y) === 0);

function draw() {
    display.clear();

    let lightMap = new Map();
    fov.compute(player.x, player.y, 10, (x, y, r, visibility) => {
        lightMap.set(map.key(x, y), visibility);
    });

    const colors = {
        [false]: {[false]: "rgb(50, 50, 150)", [true]: "rgb(0, 0, 100)"},
        [true]: {[false]: "rgb(200, 180, 50)", [true]: "rgb(130, 110, 50)"}
    };
    for (let y = 0; y < map.height; y++) {
        for (let x = 0; x < map.width; x++) {
            let lit = lightMap.get(map.key(x, y)) > 0.0,
                wall = map.get(x, y) !== 0;
            let color = colors[lit][wall];
            display.draw(x, y, ' ', "black", color);
        }
    }
    for (let entity of entities.values()) {
        if (lightMap.get(map.key(entity.x, entity.y)) > 0.0) {
            drawEntity(entity);
        }
    }
}
Ok, this seems like it’s not too hard. Looks cool:
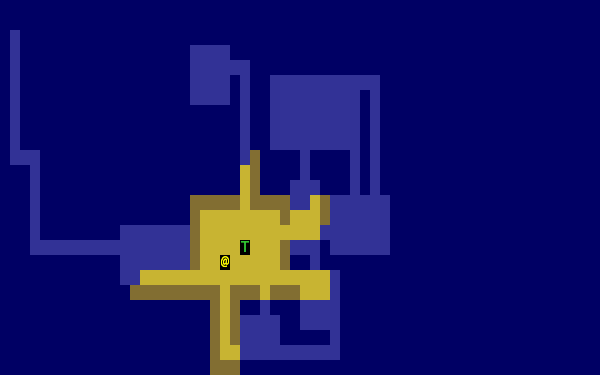
But there’s a problem: the entities (@ and T) are getting drawn with a black background color, not with the map background. In libtcod, I can set the background and foreground separately, so in the official tutorial the map sets the background and the entity sets the foreground and character. In ROT.js, I have to set all three at once.
I need to merge my drawing loops somehow.
I’m going to remove the drawEntity() function and replace it with a lookup function. Instead of drawing to the screen it only tells the draw() function what to draw.
/** return [char, fg, optional bg] for a given entity */
function entityGlyph(entityType) {
    const visuals = {
        player: ['@', "hsl(60, 100%, 70%)"],
        troll: ['T', "hsl(120, 60%, 30%)"],
        orc: ['o', "hsl(100, 30%, 40%)"],
    };
    return visuals[entityType];
}
Now the draw function has more logic, because it’s merging the entity glyph with the map background color:
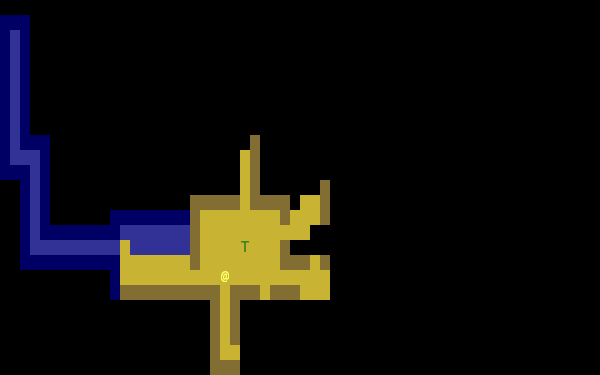
function draw() {
    display.clear();

    let lightMap = new Map(); // map key to 0.0–1.0
    fov.compute(player.x, player.y, 10, (x, y, r, visibility) => {
        lightMap.set(map.key(x, y), visibility);
    });

    let glyphMap = new Map(); // map key to [char, fg, optional bg]
    for (let entity of entities.values()) {
        glyphMap.set(map.key(entity.x, entity.y), entityGlyph(entity.type));
    }

    const mapColors = {
        [false]: {[false]: "rgb(50, 50, 150)", [true]: "rgb(0, 0, 100)"},
        [true]: {[false]: "rgb(200, 180, 50)", [true]: "rgb(130, 110, 50)"}
    };
    for (let y = 0; y < map.height; y++) {
        for (let x = 0; x < map.width; x++) {
            let lit = lightMap.get(map.key(x, y)) > 0.0,
                wall = map.get(x, y) !== 0;
            let ch = ' ',
                fg = "black",
                bg = mapColors[lit][wall];
            let glyph = glyphMap.get(map.key(x, y));
            if (glyph) {
                ch = lit? glyph[0] : ch;
                fg = glyph[1];
                bg = glyph[2] || bg;
            }
            display.draw(x, y, ch, fg, bg);
        }
    }
}
Now the background colors behind entities look reasonable:
The background color comes from the map and the foreground color and character comes from the entity.
The next step is to implement the three states of the map:
- Unexplored: don’t show anything.
- Explored, but not currently visible: show in blue.
- Visible: show in yellow.
For this I’ll add a flag explored to the map. It will start out false and become true if the tile is ever visible. I realized that my map object isn’t great. It has a get and set but that is returning 0 for a floor and 1 for a tile. I also have other similar types of maps like lightMap and a glyphMap.
I’m going to make a wrapper around 2d maps from (x,y) to any value:
function createMap(initializer) {
    function key(x, y) { return `${x},${y}`; }
    return {
        _values: new Map(),
        at(x, y) {
            let k = key(x, y);
            if (!this._values.has(k)) { this._values.set(k, initializer()); }
            return this._values.get(k);
        },
    };
}
I replaced my game map data structure with the generic one:
function createTileMap(width, height) {
    let tileMap = createMap();
    const digger = new ROT.Map.Digger(width, height);
    digger.create((x, y, contents) =>
        tileMap.set(x, y, {
            walkable: contents === 0,
            wall: contents === 1,
            explored: false,
        })
    );
    return tileMap;
}
A note about data structure: I used to fall into a loop. I would put a lot of effort into the core data structures, figuring out class hierarchies, modules, extensibility, generics, patterns, etc. Then I would use it for a bit and realize something isn’t great. But I wouldn’t change it because I had put so much effort into it that it was really hard to justify throwing anything away.
These days I don’t start with the right data structures. Instead, I start with something and then plan to change it once I figure out what I want. I discover the best patterns while working on the project, instead of starting with the patterns and then making the project fit. Because I put so little effort into the initial code, it’s no big deal to throw it out and replace it with something better.
I changed the data structures for this project four times already, and it was still faster than if I had tried to figure out everything ahead of time. I’m optimizing for making it easy to make changes.
Now that I have a 2d sparse map data structure, I’ll reuse it for the light and glyph maps. While calculating the light map, I also update the explored flag in the tile map. Another possible design would be to keep a separate exploredMap instead of modifying the tile map; that would allow for multiple explored maps corresponding to different player characters. But this will do for now.
function computeLightMap(center, tileMap) {
    let lightMap = createMap(); // 0.0–1.0
    fov.compute(center.x, center.y, 10, (x, y, r, visibility) => {
        lightMap.set(x, y, visibility);
        if (visibility > 0.0) {
            if (tileMap.has(x, y))
            tileMap.get(x, y).explored = true;
        }
    });
    return lightMap;
}

function computeGlyphMap(entities) {
    let glyphMap = createMap(); // [char, fg, optional bg]
    for (let entity of entities.values()) {
        glyphMap.set(entity.x, entity.y, entityGlyph(entity.type));
    }
    return glyphMap;
}
Here’s the new draw() function:
const mapColors = {
    [false]: {[false]: "rgb(50, 50, 150)", [true]: "rgb(0, 0, 100)"},
    [true]: {[false]: "rgb(200, 180, 50)", [true]: "rgb(130, 110, 50)"}
};
function draw() {
    display.clear();

    let lightMap = computeLightMap(player, tileMap);
    let glyphMap = computeGlyphMap(entities);

    for (let y = 0; y < HEIGHT; y++) {
        for (let x = 0; x < WIDTH; x++) {
            let tile = tileMap.get(x, y);
            if (!tile || !tile.explored) { continue; }
            let lit = lightMap.get(x, y) > 0.0;
            let ch = ' ',
                fg = "black",
                bg = mapColors[lit][tile.wall];
            let glyph = glyphMap.get(x, y);
            if (glyph) {
                ch = lit? glyph[0] : ch;
                fg = glyph[1];
                bg = glyph[2] || bg;
            }
            display.draw(x, y, ch, fg, bg);
        }
    }
}
And hey, it works!
5 Placing enemies and kicking them (harmlessly)#
Part 5 of the Python tutorial adds monsters to rooms.
One of the things the Python tutorial uses is the Python randint() function. ROT.js’s manual[15] shows that it has getUniform(), which I can wrap to make a randint() function. However if you dig deeper, ROT.js actually has the randint function[16], called getUniformInt(). There seem to be a lot of things that aren’t covered in the manual.
I made a shortcut for it:
const randint = ROT.RNG.getUniformInt.bind(ROT.RNG);
and then used it for the monster creating function:
function createMonsters(room, maxMonstersPerRoom) {
    let numMonsters = randint(0, maxMonstersPerRoom);
    for (let i = 0; i < numMonsters; i++) {
        let x = randint(room.getLeft(), room.getRight()),
            y = randint(room.getTop(), room.getBottom());
        if (!entityAt(x, y)) {
            let type = randint(0, 3) === 0? 'troll' : 'orc';
            createEntity(type, x, y);
        }
    }
}
But what is a room? The ROT.js dungeon digger records room objects in addition to tiles. I stored these in the tileMap for now.
function createTileMap(width, height) {
    let tileMap = createMap();
    const digger = new ROT.Map.Digger(width, height);
    digger.create(…);
    tileMap.rooms = digger.getRooms();
    tileMap.corridors = digger.getCorridors();
    return tileMap;
}
and then used them to make monsters in each room:
for (let room of tileMap.rooms) {
    createMonsters(room, 3);
}
Cool, it works! (Note: I disabled FOV for this screenshot)
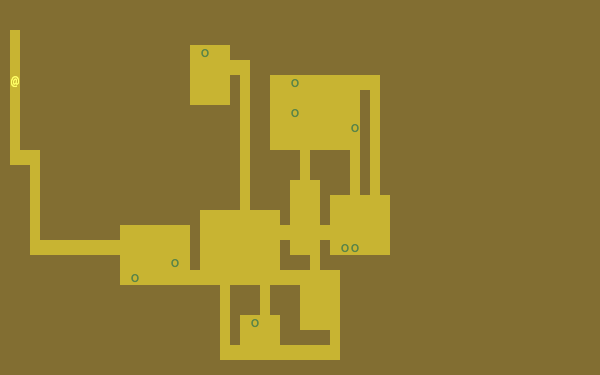
Or … does it? Why are they all orcs?! I thought there must be a bug in my code, but no, it’s just random luck. If I change the seed I get both trolls and orcs.
The next step is that they add a blocks flag to each Entity. I decided to make that a property of the entity type.
const ENTITY_PROPERTIES = {
    player: {blocks: true, visuals: ['@', "hsl(60, 100%, 70%)"],},
    troll: {blocks: true, visuals: ['T', "hsl(120, 60%, 30%)"],},
    orc: {blocks: true, visuals: ['o', "hsl(100, 30%, 40%)"],},
};
As I mentioned earlier, I’ll often do something and then change how it works later. I’m replacing the entityGlyph() function with this table.
I modified the handleKeyDown() function to check if there’s already an entity there:
…
    let newX = player.x + dx,
        newY = player.y + dy;
    if (tileMap.get(newX, newY).walkable) {
        let target = entityAt(newX, newY);
        if (target && ENTITY_PROPERTIES[target.type].blocks) {
            console.log(`You kick the ${target.type} in the shins, much to its annoyance!`);
            // TODO: draw this to the screen
        } else {
            player.x = newX;
            player.y = newY;
        }
    }
…
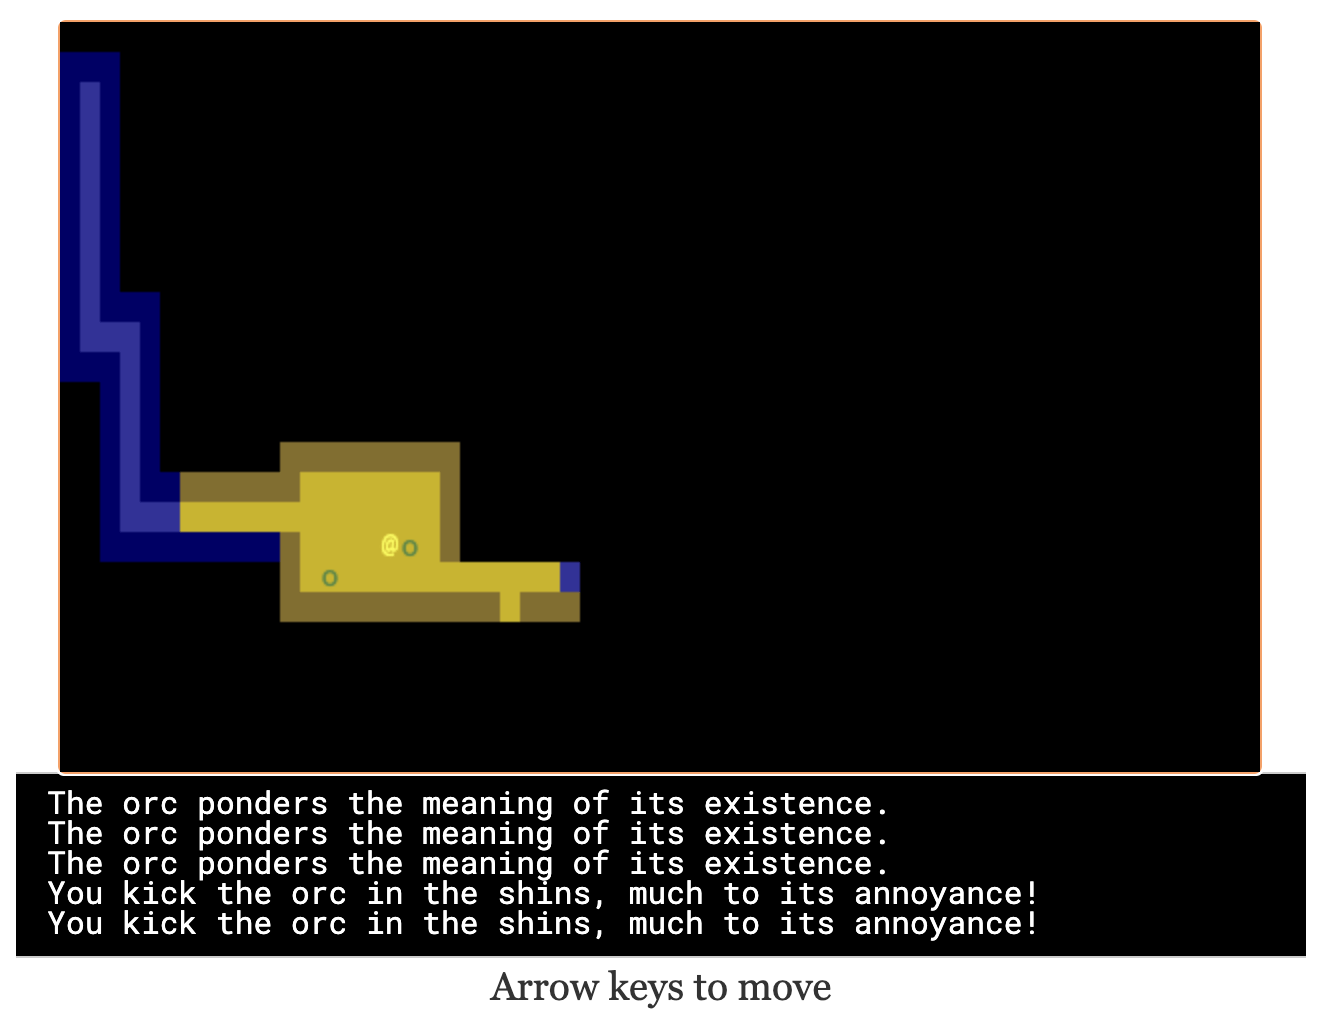
I tested this and it worked. Moving into a monster prints an message to the console.
The next section in the Python tutorial sets up a state PLAYER_TURN and ENEMY_TURN. I didn’t like the way it worked, because it will ignore the player keypress during the enemy turn. I don’t quite know what I want to do about it.
I think for now I’ll have the enemies move after each player move. I moved the above code into its own function:
function enemiesMove() {
    for (let entity of entities) {
        if (entity !== player) {
            console.log(`The ${entity.type} ponders the meaning of its existence.`);
        }
    }
}
Since my random number generator produced all orcs, I get a lot of console messages:
The orc ponders the meaning of its existence.
Great! Before I move on to the next part of the tutorial, I wanted to add a way to see the messages under the game screen.
5.1 Console#
I updated the UI to have an extra div for messages, and put the instructions box below it. This is covered in the Python tutorial part 7, but I implemented it earlier:
<figure>
  <div id="game"></div>
  <pre id="messages"></pre>
  <div id="instructions"/>
</figure>
I gave it some style:
#messages {
    box-sizing: border-box;
    font-size: 0.8em;
    height: 6em; /* see explanation below */
    line-height: 1.0;
    background: black;
    color: white;
    margin: 0;
    padding: 0.5em 1em;
    text-align: left;
}
The size calculation was a little tricky. I want the height to be 5 lines tall. A line is typically line-height times font-size. I set the line height to 1.0 so it seems like the height will be 1.0 * 0.8em * 5 = 4em. But it’s not! The css for <pre> em is relative to the <pre>’s font size, except for font-size: 0.8em which is relative to the parent <figure>’s font size. So it’s really 1.0 * 1em = 5em. Plus, with box-sizing: border-box I need to include the size of the padding. Both the top and bottom padding are 0.5em here so that means the total height of the box is 6em.
Ok, and here’s the Javascript to print a line of text to the message area:
function print(message) {
    const MAX_LINES = 5;
    let messages = document.querySelector("#messages");
    let lines = messages.textContent.split("\n");
    lines.push(message);
    while (lines.length > MAX_LINES) { lines.shift(); }
    messages.textContent = lines.join("\n");
}
And here’s the updated code for the instructions box, which used to hide/show “Click game to focus” but now replaces that text with “Arrow keys to move”:
function setupKeyboardHandler(display, handler) {
    const canvas = display.getContainer();
    const instructions = document.getElementById('instructions');
    canvas.setAttribute('tabindex', "1");
    canvas.addEventListener('keydown', handleKeyDown);
    canvas.addEventListener('blur', () => { instructions.textContent = "Click game for keyboard focus"; });
    canvas.addEventListener('focus', () => { instructions.textContent = "Arrow keys to move"; });
    canvas.focus();
}
Here’s what it looks like:
Back to the Python tutorial.
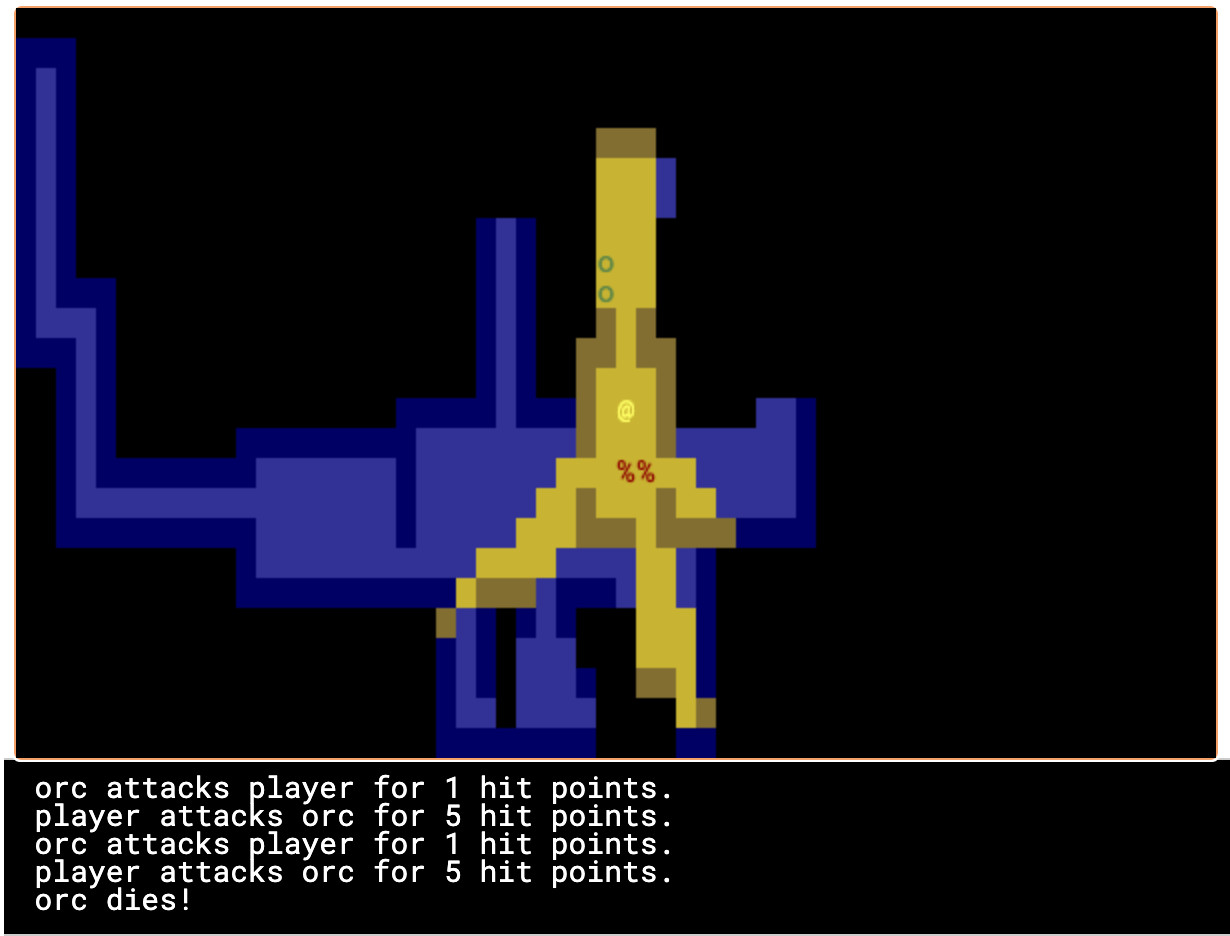
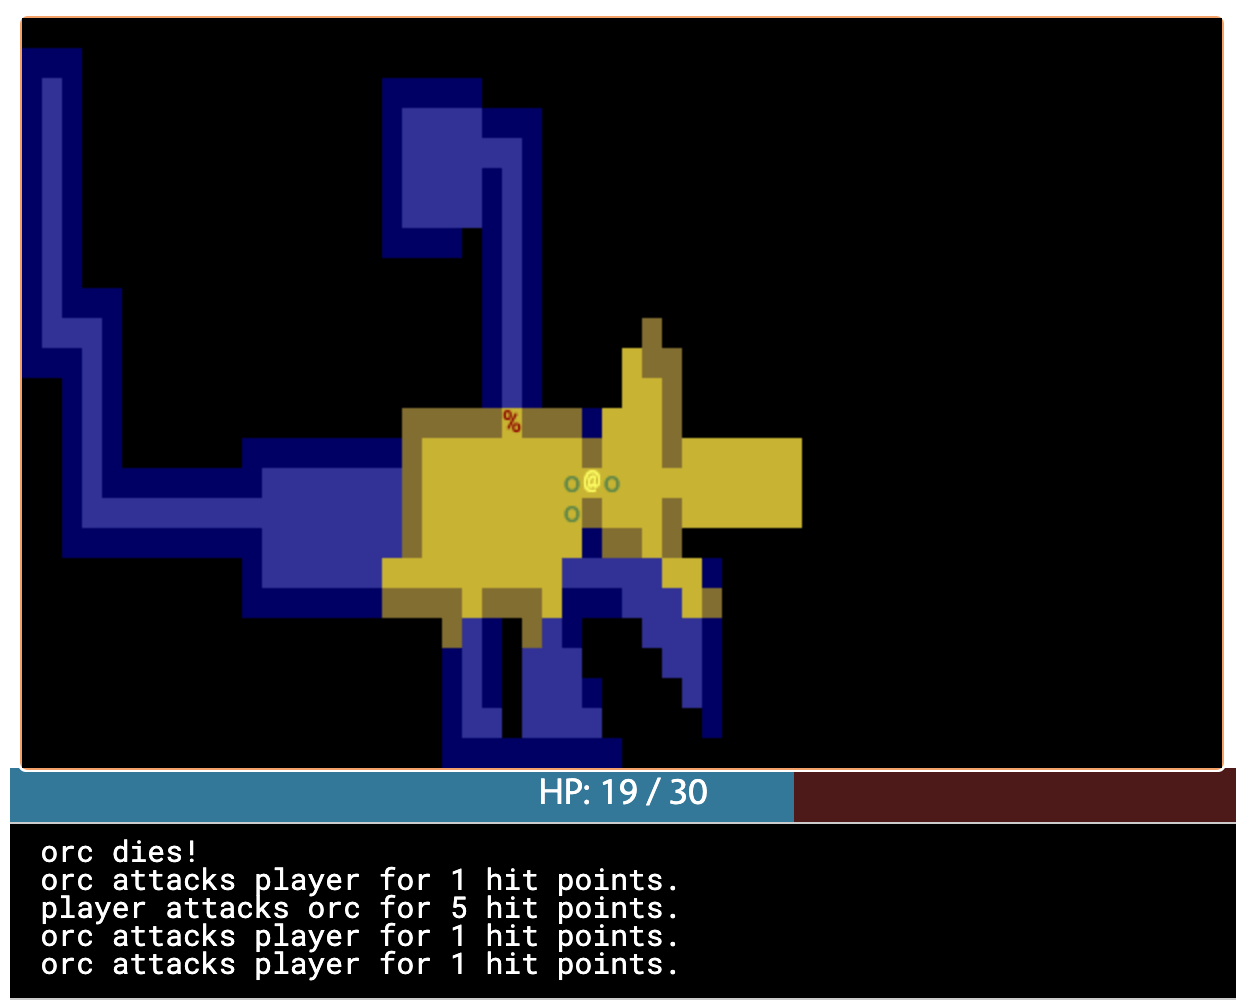
6 Doing (and taking) some damage#
Part 6[17] of the Python roguelike tutorial adds a “fighter” component with hp, max_hp, defense, power, and an “ai” component that tells the monster how to move.
This is the part of the tutorial where the real game logic starts. My goal is to implement the features from the Python tutorial, but not necessarily with the same code structure.
My own coding style is to prefer separating “static” from “instance” data and functions. Static properties are part of the game. Instance properties are part of running the game. For example, the troll’s color is a static property of the troll. The color is decided before any trolls exist. It is the same for all trolls, but it might be different if I change the program code. A position is an instance property of the troll. It is different for each troll, but it’ll be the same if I load the save file in new version of the game.
I also prefer to use “free functions” (static) and “plain old data” (instance) instead of combining them into classes. It makes things like persistence and multiplayer easier for me to implement. I’m going to do this not only for the entity but also the fighter and ai components.
For the entities, I put the static properties into a ENTITY_PROPERTIES lookup table, and I used Javascript prototype inheritance to attach it to each entity.
For the fighter and AI, I decided to look ahead in the tutorial to see how they will get used.
- For the fighter, I was planning to treat
defenseandpowerandmax_hpas static properties, andhpas a per object property, but it looks likedefenseandpowerandmax_hpall become computed properties, so maybe this is a premature design decision. Theattack()function seems to be the same for all entities so I think I’ll leave it out of the entity/component (in ECS it’d be a “system”). I’m seeing no particular value in making this a separate component right now. - For the AI, it’s either a basic monster that moves towards the player, or a confused monster that moves randomly for some number of turns and then reverts to the previous AI behavior. I think I could treat that as a function, but functions don’t work well with persistence, so I’m going to treat it as data that has a
typefield, like I did with entities.
I’m going to see how far I can get without adding an owner pointer. I strongly prefer not to have it, because it leads to a circularity in the data, which will make persistence more complicated. In an ECS this circularity would be broken by storing an entity id instead of a pointer to the entity object, but I’m not using an ECS here.
Here’s an example of a top level function that’s not a method of either the attacker or defender:
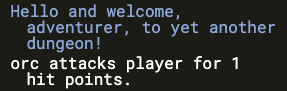
function attack(attacker, defender) {
    let damage = attacker.power - defender.defense;
    if (damage > 0) {
        takeDamage(defender, damage);
        print(`${attacker.type} attacks ${defender.type} for ${damage} hit points.`);
    } else {
        print(`${attacker.type} attacks ${defender.type} but does no damage.`);
    }
}
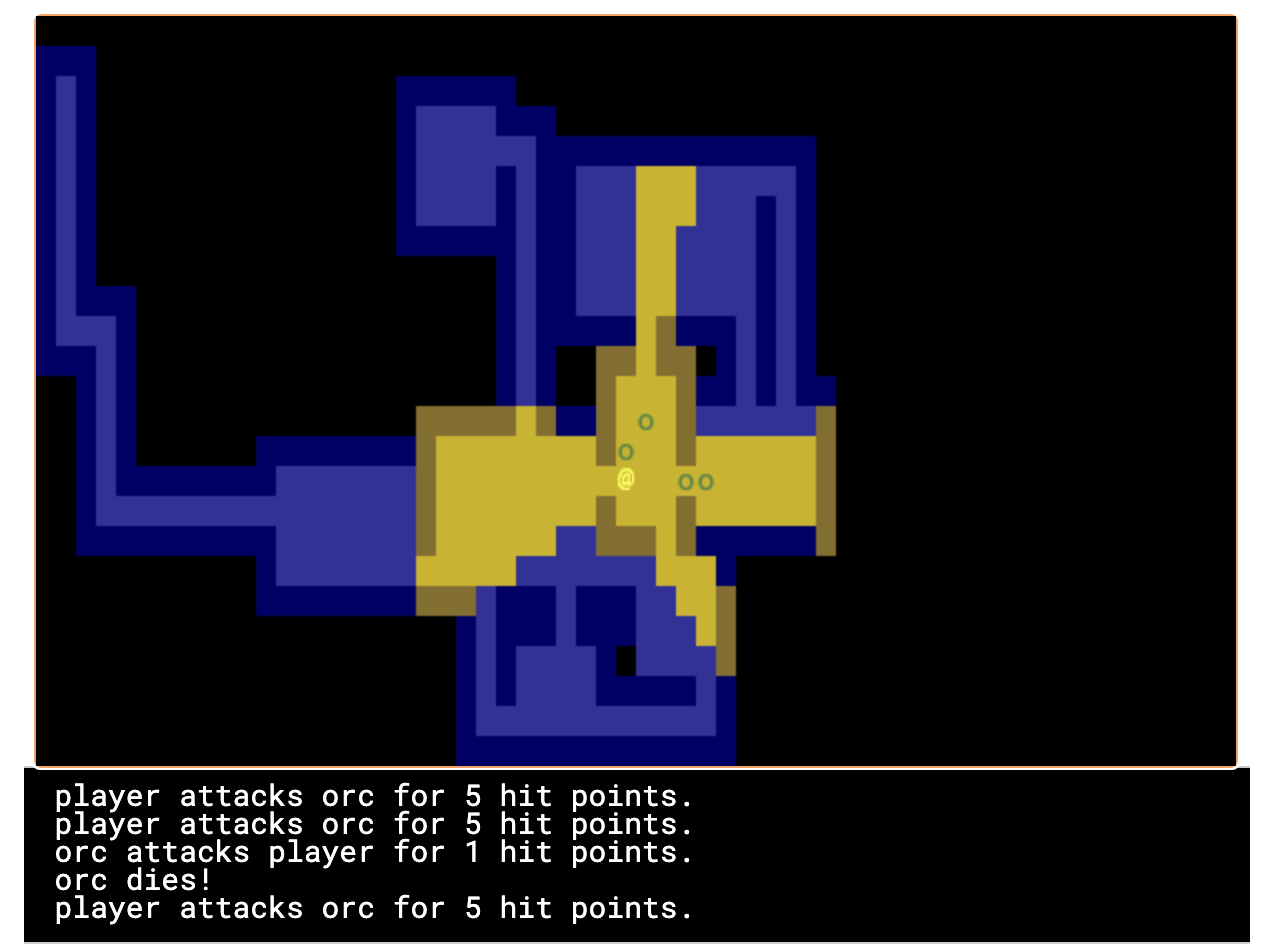
I added the fighter and ai components, but not in the same way the Python tutorial implemented them. I’ll refactor later.
Then I implemented rendering order as a static property of each entity.
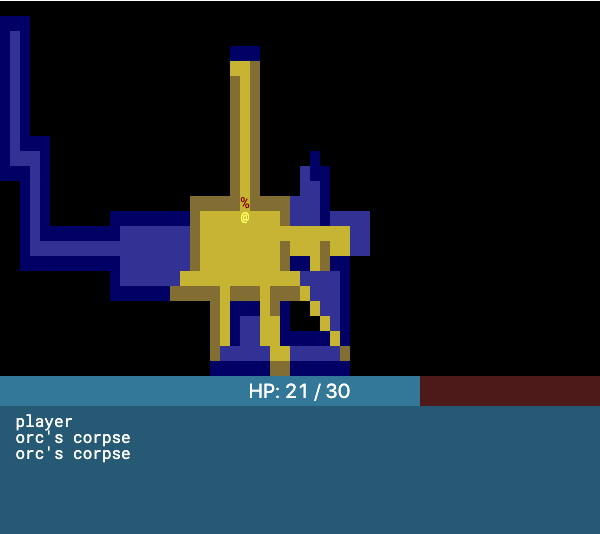
Then I worked on handling dead bodies. I change their type to corpse to get them to switch all static properties (blocks, character, color, render order) at once.
It’s starting to come together!
7 Creating the Interface#
7.1 Health bar#
Part 7[18] of the Python tutorial covers three topics:
- health bar
- message area
- entity info on mouseover
I already implemented the message area earlier. It’s in HTML instead of in ROT.js. I’m going to implement the health bar in HTML as well.
7.2 Message area, part 2#
I also improved the message area:
- added color by switching from
<pre>to a<div>with<div>children, each with a csscolor: …set - got word-wrap for free by making this switch!
- added indentation by applying css
margin-left: 1em; indent-text: -1em;so that a message that wraps will get subsequent lines indented - added scrolling by setting css
overflow-x: hidden; overflow-y: scrollbut hid the scrollbar usingscrollbar-width: none(Firefox supports the standard[19]) and::-webkit-scrollbar { width: 0 }(Chrome and Safari naturally have their own non-standard approach) - added a spacing between the messages with
margin-bottom: 0.25emso that the line spacing within messages is smaller than between messages
Version 2 of the Python tutorial also adds a way to scroll the message area, integrated into its event loop. The browser gives me that for free, although it’s mouse based and not keyboard based like the Python version. Version 2 also adds message stacking, but I didn’t implement that either.
I think it wouldn’t be hard to add color within lines. I did that with my DOS games[20] and liked the effect. But for now I’m sticking to implementing the features from version 1 of the Python tutorial.
7.3 Mouse info#
The Python tutorial fits the mouse handling into the main event loop but the browser has its own event loop, so I deviated from the tutorial’s approach.
First question is: where do I want to display this information? I decided to use CSS grid to display it over the message console. Here’s the HTML:
  <div id="message-area">
    <div id="messages"/>
    <div id="message-overlay"/>
  </div>
Normally this would be laid out with the message console (#messages) first and then the next div afterwards. But with CSS grid I put them in the same spot:
      #message-area {
          margin: auto;
          display: grid;
          grid-template-areas: "all";
          height: 8em;
          font-family: monospace;
          font-size: 0.8em;
          line-height: 1.0;
      }
      #messages {
          grid-area: all;
          …
      }
      #message-overlay {
          grid-area: all;
          z-index: 2; /* workaround for chrome */
          opacity: 0.0;
          background: hsl(200, 50%, 30%);
          color: white;
          white-space: pre-wrap;
      }
      #message-overlay.visible {
          opacity: 1.0;
      }
Then in the code, I set the opacity to 1 if there’s text and 0 if not:
const setOverlayMessage = (() => {
    let area = document.querySelector("#message-overlay");
    return function(text) {
        area.textContent = text;
        area.setAttribute("class", text? "visible" : "");
    };
})();
This works nicely! Except on Chrome, where it works initially but then fails later for reasons I couldn’t figure out. By adding z-index: 2 to the overlay, it worked, but I don’t understand why.
The next step is to attach a mousemove listener to the <canvas>. I didn’t integrate into the main game loop, but instead have this running independently.
Not mentioned in the ROT.js interactive manual, ROT.js’s display class has a useful method eventToPosition, documented here[21]. It takes a mouse event and gives us back a grid tile location. If it returns [-1, -1] it was out of range (which seems like it should never happen, but does).
function allEntitiesAt(x, y) {
    return Array.from(entities.values()).filter(e => e.x === x && e.y === y);
}

function handleMousemove(event) {
    let [x, y] = display.eventToPosition(event); // returns -1, -1 for out of bounds
    let entities = allEntitiesAt(x, y);
    let text = entities.map(e => e.name).join("\n");
    setOverlayMessage(text);
}

function handleMouseout(event) {
    setOverlayMessage("");
}

const canvas = display.getContainer();
canvas.addEventListener('mousemove', handleMousemove);
canvas.addEventListener('mouseout', handleMouseout);
Hooray, it works!
This feature was relatively easy to implement.
But … this broke the message area scrolling! The problem is that the scroll mouse event gets sent to the overlay, even when its opacity is 0.0. I fixed this by adding CSS:
      #message-overlay {
          …
          pointer-events: none;
      }
While I was at it, I also added a fade-out effect using transition: all 0.3s to #message-overlay and transition: all 0s to #message-overlay.visible. When making the overlay visible, it will have no transition (0s) but when making the overlay invisible it will use a quick transition (0.3s).
8 Items and Inventory#
Part 8 of the Python tutorial covers items and inventory.
8.1 Items and locations#
I decided to use a different representation than they use. To pick up an item, they remove the entity from the global entities array, and then ignore the x and y fields on it.
- instead of entities having
xandy, they havelocation, which can be either-
{x:int, y:int}if the entity is on the map, or -
{carried:id, slot:int}if the entity is in someone’s inventory.
-
- instead of inventory having
capacity:intanditems:Array<object>, the inventory is a fixed lengthArray<null|id>, with the length being the capacity.
In the Python tutorial, if you pick up a potion of healing, then pick up a potion of confusion, they will be assigned keys a and b. If you drop the first potion, then the potion of confusion changes from b to a. I like the Brogue approach, where an item keeps its key, so I represented the inventory as a fixed size array where each slot can contain an item or null.
The logic for this is slightly tricky because there are two systems that have to be kept in sync. To pick up an item, I need to update both the item’s data and the carrier’s data:
- item
A:{carried: E.id, slot: P} - entity
E:{inventory: […, A.id, …]}where that id is in positionP
And to drop the item I need to update both again:
- item:
A:{x: x, y: y} - entity
E:{inventory: […, null, …]}
What happens if the entity is consumed? I haven’t decided yet.
I wanted to encapsulate the logic for keeping this data in sync, so I wrote a function:
function moveEntityTo(entity, location) {
    if (entity.location.carried !== undefined) {
        let {carried, slot} = entity.location;
        let carrier = entities.get(carried);
        if (carrier.inventory[slot] !== entity.id)
            throw `invalid: inventory slot ${slot} contains ${carrier.inventory[slot]} but should contain ${entity.id}`;
        carrier.inventory[slot] = null;
    }
    entity.location = location;
    if (entity.location.carried !== undefined) {
        let {carried, slot} = entity.location;
        let carrier = entities.get(carried);
        if (carrier.inventory === undefined)
            throw `invalid: moving to an entity without inventory`;
        if (carrier.inventory[slot] !== null)
            throw `invalid: inventory already contains an item ${carrier.inventory[slot]} in slot ${slot}`;
        carrier.inventory[slot] = entity.id;
    }
    // TODO: add constraints for at most one (player|monster) and at most one (item) in any {x, y}
}
This logic is tricky enough that I want to make sure I have plenty of assertions in there!
8.2 Inventory actions#
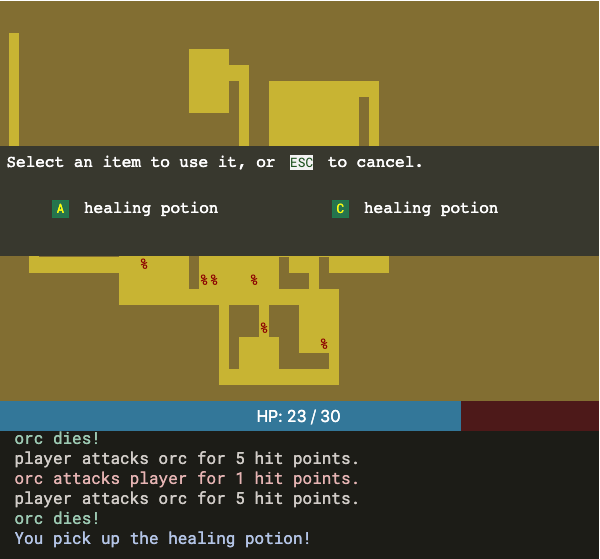
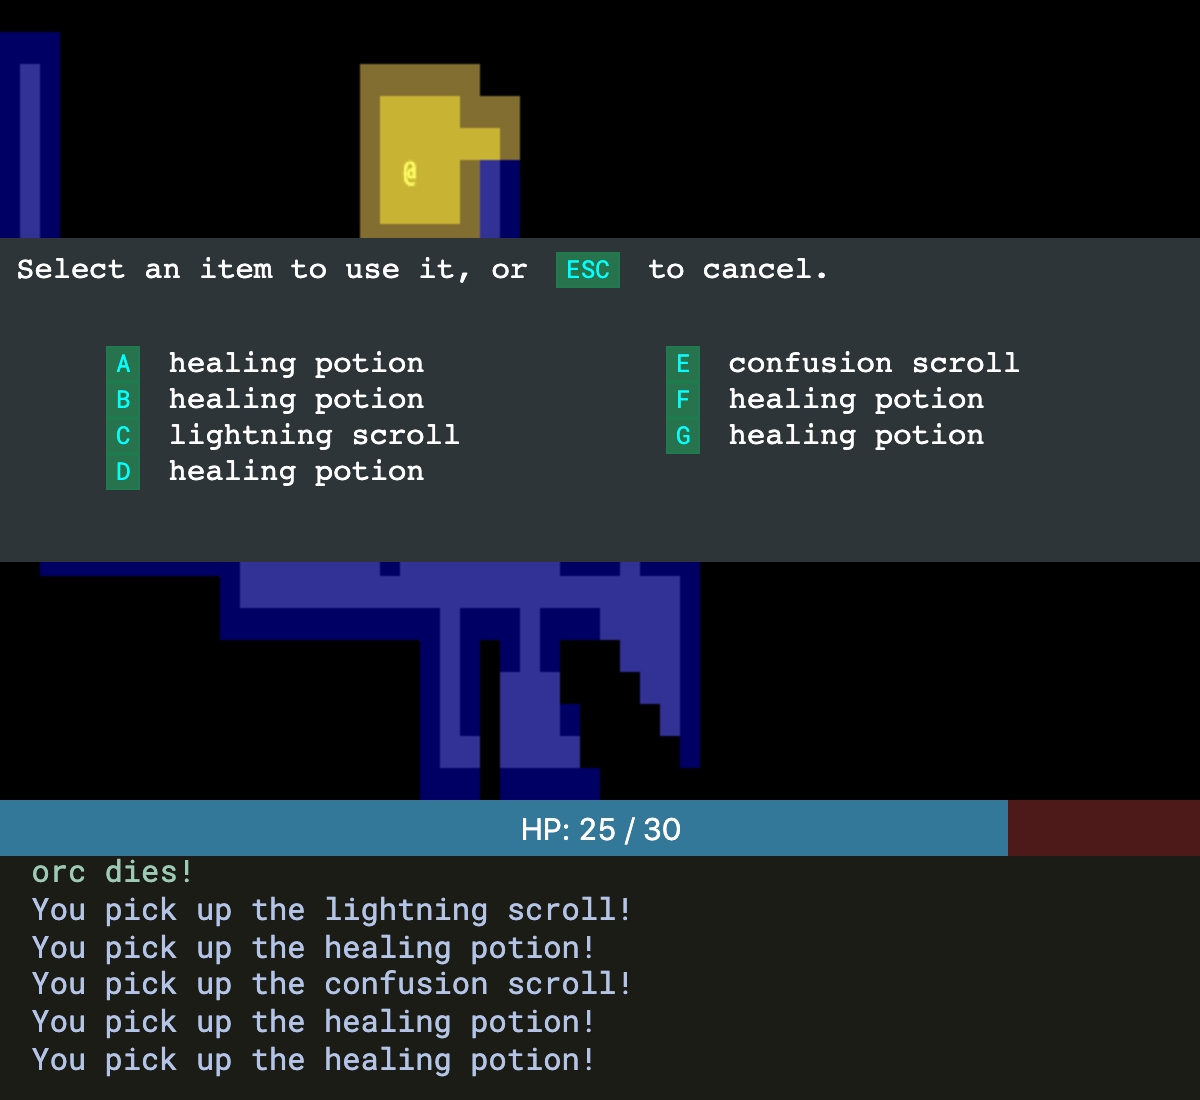
Part 8 also introduces an inventory UI. Since the browser already provides multiple UI elements, I wanted to try using them instead of creating my own as the Python version is forced to do. I created a new overlay <div id="inventory-overlay"> and hid it when not in use.
I had hoped to try using the focused element status from the browser to keep track of whether the main game had focus or the inventory dialog had focus, but that ended up being more complicated than I wanted to tackle right now. The main problem is that the user may change the focus with the browser controls (mouse or keyboard) instead of going through the game’s controls and then I need to handle that somehow.
The inventory UI gets used for two actions: use and drop. When invoking the action, I need to remember which action I’ll perform when the inventory item is selected. This also affects the text the player sees at the top of the dialog box.
I decided the way to remember the action is to make two separate inventory overlays. I can apply different styling to them, but have them share common code.
As with the message area, I needed to use CSS pointer-events: none on these inventory screens so that clicking on them will give the underlying <canvas> focus.
I’ve been sharing less code as I go along, in part because the refactorings made it harder to show the changes, but also, because I’m spending more time on the code and less on this explanation of it.
9 Ranged scrolls and targeting#
Part 9[22] adds new items:
- a lighting scroll that will attack the nearest visible enemy
- a fireball scroll that lets you click on an enemy to attack
- a confuse scroll that lets you click on an enemy to confuse
This complicates the game state some more, because we need to remember which item is being cast. I think I can do this with the browser’s event system. I’ll add an overlay during spell casting, and attach event handlers to it that remember the item, and then remove the event handlers and the overlay when the item is used or the action is cancelled.
There’s a little glitch with this idea: because I had been using pointer-events: none, mouse events don’t go to the targeting overlay. Easy fix: set pointer-events: auto. But now when clicking on the targeting overlay, the game loses focus! For now my workaround is to re-focus the game canvas after receiving a click on the targeting overlay, but I think this isn’t a great solution.
10 Saving and loading#
The Python tutorial (v1) has complex objects that they save using the shelve module. In my project I’ve tried to keep the objects simple enough to fit into JSON. Did I succeed? Let’s look at the world data:
tileMapentities-
player(this is one entry fromentities) - ROT.js’s RNG state
How about UI state?
- the message log
- whether the “use item” screen is up
- whether the “drop item” screen is up
- whether the “targeting” overlay is up for fireball and confusion
- whether the “mouseover” overlay is up
- the current mouseover position and text
I don’t want to save these. Or maybe I should save the message log like the tutorial does. I’d have to change the message log code to allow saving; I’ll do that later.
How about constants?
- the size of the map
- the colors of the monsters
- whether entities block, or are an item
For now I’ll assume the map size doesn’t change. I would eventually want to change it so that the map size can be anything, and what’s displayed on screen is the portion of the map near the player. The other things are safe to change.
Did I keep data JSON-compatible? The answer is no! I ended up using a class for the tile map, and a dictionary structure for both the tile map and the entities. I decided to change my tile map to use objects instead:
function createMap() {
    function key(x, y) { return `${x},${y}`; }
    return {
        _values: {},
        has(x, y) { return this._values[key(x, y)] !== undefined; },
        get(x, y) { return this._values[key(x, y)]; },
        set(x, y, value) { this._values[key(x, y)] = value; },
    };
}
Working with globals is tricky, and I ended up with a bug that I would’ve never caught with the current state of the game: createEntity.id stores the next id to use. I never use this once the map is created, but that would’ve been a tricky bug to catch. Ugh. Even though I thought I was doing everything to make serialization easy, I missed that. I’d like to say this taught me my lesson, and that I’ll do things better next time, but I will probably have to learn this lesson a few more times before it sticks.
Despite the few bugs I ran into, I think this went pretty well. Here’s the code for saving:
function serializeGlobalState() {
    const saved = {
        entities: Array.from(entities),
        nextEntityId: createEntity.id,
        playerId: player.id,
        tileMap: tileMap,
        rngState: ROT.RNG.getState(),
    };
    return JSON.stringify(saved);
}
I construct a single JSON object with all the globals I want to save.
Here’s deserialization:
function deserializeGlobalState(json) {
    const reattachEntityPrototype = entry =>
          [entry[0], Object.assign(Object.create(entity_prototype), entry[1])];
    const saved = JSON.parse(json);
    entities = new Map(saved.entities.map(reattachEntityPrototype));
    createEntity.id = saved.nextEntityId;
    player = entities.get(saved.playerId);
    Object.assign(tileMap, saved.tileMap);
    ROT.RNG.setState(saved.rngState);
}
I restore all the globals I saved earlier, but I have to fix up the entities. I had been using Javascript prototype inheritance to attach the in-world data (location, health, etc.) with the static data (color, blocks or not, etc.). The JSON serialization saves the in-world data but I need to reattach the static data after deserializing. That’s what the reattachEntityPrototype function does.
Now I can save to a string and restore from a string. The Python tutorial saves the data to a file on exit, and offers a key to create a new game or to load the game from the file. I am running this in a browser, and there’s no exiting, so I’m going to do things differently. Either:
- I could save to
localStorageevery turn, and load from it when opening the page. There’d also be a key to start a new game. - I could have a key to save and a key to load, and I could rely on reloading the page to start a new game.
I decided on 2. The Python tutorial uses A for new game, B to load, C to save. But this is because they have a game menu at the beginning. I don’t have a game menu so I’ll use S to save, R to restore.
It all works nicely! Except…
I didn’t serialize the messages. I thought it’d be no big deal but it doesn’t look right. My print() function directly writes to the page. I changed print() to append to a global messages array:
const MAX_MESSAGE_LINES = 100;
let messages = []; // [text, className]
function print(message, className) {
    messages.push([message, className]);
    messages.splice(0, messages.length - MAX_MESSAGE_LINES);
    drawMessages();
}
And then I have a separate function to draw that array to the page:
function drawMessages() {
    let messageBox = document.querySelector("#messages");
    // If there are more messages than there are <div>s, add some
    while (messageBox.children.length < messages.length) {
        messageBox.appendChild(document.createElement('div'));
    }
    // Remove any extra <div>s
    while (messages.length < messageBox.children.length) {
        messageBox.removeChild(messageBox.lastChild);
    }
    // Update the <div>s to have the right message text and color
    for (let line = 0; line < messages.length; line++) {
        let div = messageBox.children[line];
        div.textContent = messages[line][0];
        div.setAttribute('class', messages[line][1]);
    }
    // Scroll to the bottom
    messageBox.scrollTop = messageBox.scrollHeight;
}
Much better!
The Python tutorial does a lot of other things to restructure the code but I didn’t feel the need to do any of that.
11 Delving into the Dungeon#
Part 11 covers several things:
- Stairs
- Dungeon levels
- Experience points
- Player levels
- Upgrade menu when leveling up
- Character stats screen
11.1 Stairs#
The Python tutorial has a render order: actor > item > corpse > stairs. That means a corpse will block the stairs if you are in the room, but you can see the stairs once you step outside the field of view. I switched stairs and corpse.
Because of the way I draw things, if there’s a monster on top of the stairs, the monster is to be drawn. But if the monster isn’t in the field of view, that spot will be hidden. And that means the stairs will be hidden too. This is a bug but I’ll have to redesign some of my drawing code to fix it. I added it to my list of things to do, but I’m not going to work on it right now. It seems like a rare situation. I like to accumulate several related bugs before some code redesign so that I can tackle all those problems together.
Another possible issue is that there can be two items in one tile, and no way to access them separately.
11.2 Dungeon levels#
I had hard-coded the player’s starting location to work with the initial map for one particular seed. That doesn’t work when generating new maps, so I checked the Python tutorial to see what they did. They start the player in the first generated room. That sounds like a good solution to me. I placed the player first because the monster generator will avoid placing another monster on top of a blocked tile.
The Python tutorial discards all entities other than the player when changing dungeon levels. I’m representing my entities a little differently. The global entities set also contains entities that are in a creature’s inventory. A location can either be {x: y:} for something on the map, or {carried: slot:} for something carried by someone. When changing dungeon levels I discarded all entities with {x: y:} except the player.
A different design would be to change entities to {x: y: z:}. Then I wouldn’t discard any entities when changing levels. This would allow going back to a previous level. To avoid scope creep I’m limiting features to what’s in the Python tutorial, so I added this to my “future ideas” list.
11.3 Experience points#
This may be a little tricky, because I deviated from the Python tutorial a few weeks ago. They had returned an object which described the message to print, whereas I had printed it directly. But now they’re returning additional information like the experience points gained. Where will that fit into my code?
I think if I keep going with this project I’d want to refactor this into an event system and not use the approach used by the tutorial. But for now I’m going to do the simplest thing that could possibly work. I’ll only allow the player to gain xp.
11.4 Player levels#
The tutorial uses a Level component with level_up_base set to 200 and level_up_factor set to 150. I don’t see myself varying these per instance, so I’m going to express this instead as a function that calculates the xp needed to reach a specific level. The tutorial has current_xp reset every time you gain a level. I’m going to have it always go up.
The formula is encoded in this code:
@property
def experience_to_next_level(self):
    return self.level_up_base + self.current_level * self.level_up_factor
Let’s see what that looks like:
| current_level | experience_to_next_level | total xp |
|---|---|---|
| 1 | 350 | 350 |
| 2 | 500 | 850 |
| 3 | 650 | 1500 |
| 4 | 800 | 2300 |
| 5 | 950 | 3250 |
| 6 | 1100 | 4350 |
| 7 | 1250 | 5600 |
| 8 | 1400 | 7000 |
| 9 | 1550 | 8550 |
| 10 | 1700 | 10250 |
Is there a compact formula for the total xp column? Yes: it simplifies to 200 * N + 150 * (N * (N+1)) / 2, where N is the current level. When we get past that amount, it’s time to level up.
function xpForLevel(level) {
    return 200 * level + 150 * (level * (level+1)) / 2;
}
Now the player can level up with this code:
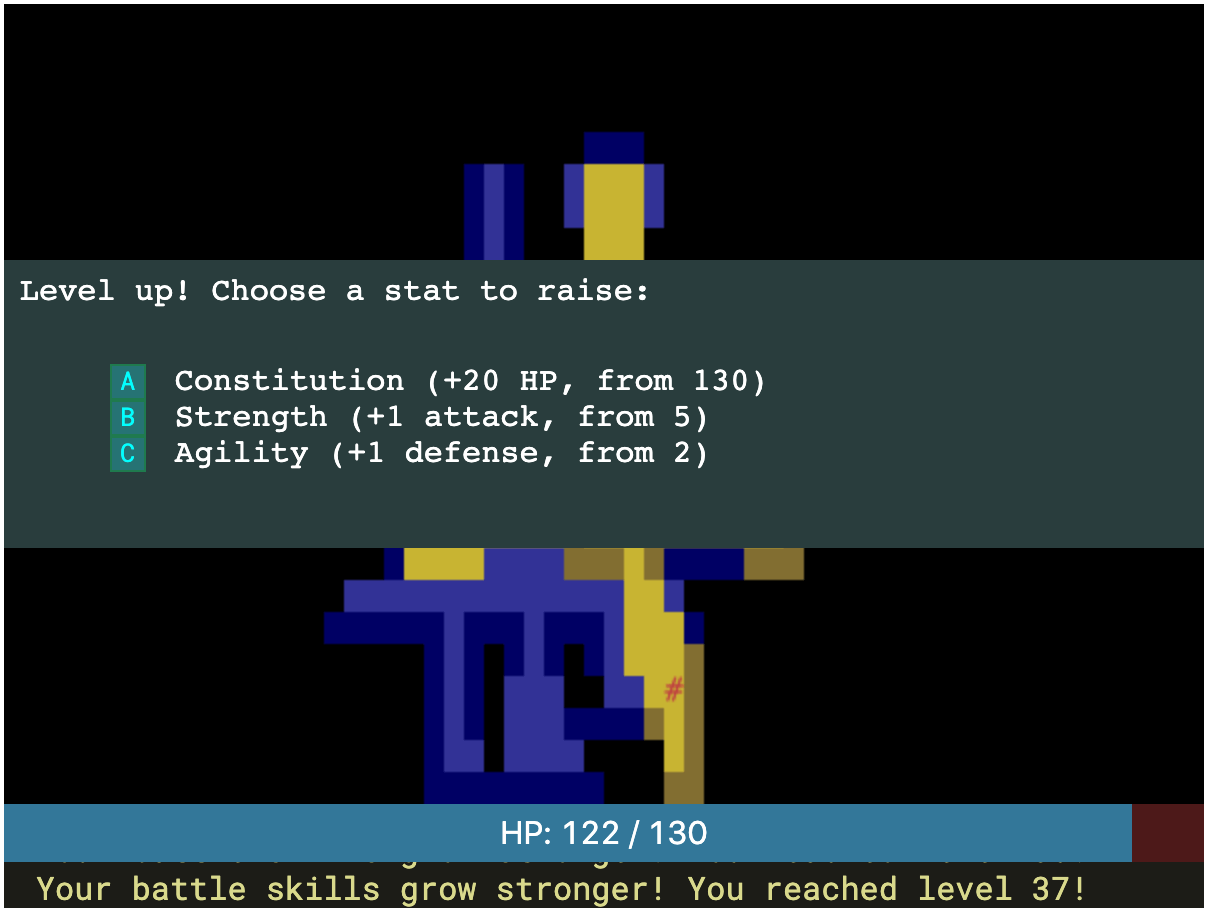
function gainXp(entity, amount) {
    if (!entity.xp) { return; } // this entity doesn't gain experience
    entity.xp += amount;
    if (entity.id !== player.id) { throw `XP for non-player not implemented`; }
    print(`You gain ${amount} experience points.`, 'info');
    while (entity.xp > xpForLevel(entity.level)) {
        entity.level += 1;
        print(`Your battle skills grow stronger! You reached level ${entity.level}!`, 'warning');
        // TODO: let player choose an upgrade
    }
}
11.5 Level upgrade#
After leveling up the Python tutorial immediately brings up a menu where you can choose an upgrade: constitution, strength, or agility. I’m going to implement this menu with an overlay, just as I did with inventory. This might be a good time to generalize the inventory menu code to work as any menu, like the Python tutorial has already done, but it wasn’t immediately obvious how I should do that so I’m writing a new function to handle level upgrades, and will then figure out a general pattern later.
There’s a logic bug in my code: if I leveled up twice in one combat action, I only get to pick an upgrade once. Killing a monster won’t trigger this bug, but using fireball can kill several trolls at once, and that would be enough to trigger this bug. It seems like it won’t happen often, so I’ve added this to the list of things to look at later. One way to handle this would be to have another field on the player to indicate how many upgrades I have remaining.
11.6 Character stats screen#
The character screen shows level, xp, xp to next level, max hp, attack, defense. In the Python tutorial it’s formatted inside the game screen, but I’m going to use the browser’s layout system to put it in an overlay, like I have done with inventory and upgrades.
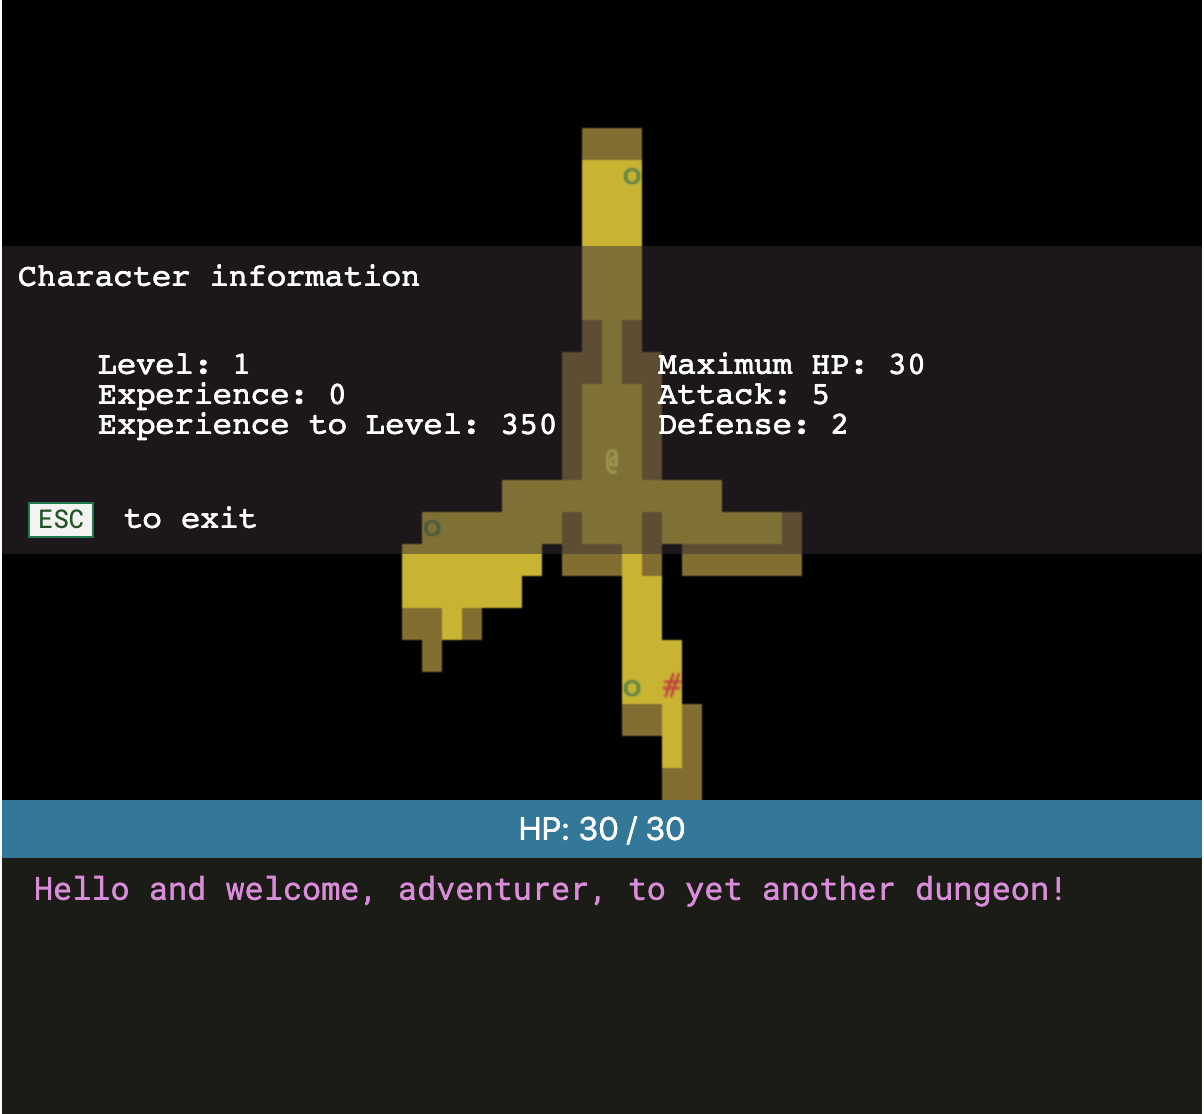
I like it.
12 Increasing Difficulty#
I’m going to keep following the tutorial but I’m losing interest at this point. I think the problem is that I’m following the tutorial in part to complete something, but I’m not especially interested in the game itself. The difficulty levels are about the game design rather than the implementation techniques I want to learn.
The Python tutorial adds a function random_choice_from_dict and random_choice_index. I can instead use the poorly documented ROT.RNG.getWeighted[23] function. If you’re using rot.js, I urge you to browse the autogenerated documentation[24] because it contains useful things that aren’t described in the manual.
The tutorial also adds a function
def from_dungeon_level(table, dungeon_level):
    for (value, level) in reversed(table):
        if dungeon_level >= level:
            return value
    return 0
It uses a table [[2, 1], [3, 4], [5, 6]] to mean:
- at level 1, return 2
- at level 4, return 3
- at level 6, return 5
I decided to invert these tables. I like to think of input then output, so I changed this table to [[1, 2], [4, 3], [6, 5] and wrote this code instead:
function evaluateStepFunction(table, x) {
    let candidates = table.filter(xy => x >= xy[0]);
    return candidates.length > 0 ? candidates[candidates.length-1][1] : 0;
}
If I were using lodash, I’d use findLastIndex[25]: _.findLastIndex(table, xy => x >= xy[0]).
This section of the tutorial was pretty short.
13 Gearing up#
Ok, this is back to some interesting stuff. How do I want to support “equipment” separate from “inventory”? I’m going to use a slightly different model from what the Python tutorial uses.
13.1 Equipment#
Their model: equipment is a subset of inventory. An item is in your inventory and can be equipped or unequipped. If you drop an item from inventory, you also unequip it. If you already had an item equipped when you equip a new one, you unequip the old one.
My model: equipment is another location, like inventory. An item is in your inventory or in your equipment. If you drop an item from inventory, it is not unequipped because inventory items are not equipped.
But now I need a way to unequip things into your inventory. And what if the inventory is full?
Partway down the Python tutorial has the player have some initial equipment. I’m going to take this further and say that the player has all equipment slots filled. Always. When you equip a new item from your inventory, it swaps position with the item that you already had equipped there. This solves the problem with unequipping into a full inventory, because you can only unequip by equipping something else.
I initially extended my moveEntityTo function to work with equipment but then decided to write a separate one swapEquipment which will perform the swap more simply than two moves, and ensure that the equipment slot is always full.
13.2 Initial equipment#
Equipment has to have properties item: true, equipment_slot: X. When equipped it will have location: {equipped_by: entity, slot: X}. Those X’s have to be the same (equipment can only be put into a valid slot).
Before I had moveEntityTo to handle all the invariants, but now I don’t have that for equipment, so I need to carefully construct the initial equipment for the player:
- construct equipment as an entity
dagger. -
player.equipment[main_hand_slot]should containdagger.id -
dagger.locationshould be{equipped_by: player.id, slot: main_hand_slot}
13.3 Bonuses#
I ended up with these fields, where F is max_hp, power, or defense:
-
bonus_Fon the item -
base_Fon an actor -
increased_Fon an actor is a computed property summing the bonuses from equipmet -
effective_Fon an actor is a computed property summing the base and increased values
The character screen shows the base and increased values:
14 Conclusion#
This was a fun project. I had tried previously with Rust, but learning Rust and learning to write a roguelike game was tackling two things when I should’ve tackled only one at a time. This time went better.
My code is nowhere near as nicely structured as the Python code, but this is often my style. I tend to write big files with lots of functionality. In this case everything fit into one file of around 1050 lines. The Python tutorial v1 is around 1800 lines but it’s better structured.
I don’t think I’ll use any of this code in a future project, but the code itself is not the valuable part of following this tutorial. I learned the design patterns and the pieces that went into this type of game.
15 Future#
After I finished, I added one more thing: I changed the instructions line from one line of static text to one line of html, constructed to match where you are in the game. If you are standing over stairs, it will tell you [>] stairs. If you are standing over an item, it will tell you [g]et item. The problem is that the logic for determining whether something is a valid action is now in three places: the keyboard handler, the instructions, and the actual action handler. The instructions need to know things like which overlay is displaying. I think this would be a useful place to have some type of abstraction for the logic saying which actions are valid.
Other things I considered but didn’t get around to:
-
[ ]make the light level vary more smoothly than visible/invisible -
[ ]make all the keyboard controls work on touch screens -
[ ]add keyboard controls for targeting and looking at the map -
[ ]add mouseover feedback when targeting, such as showing the blast radius for the fireball spell -
[ ]distinguish permanent and temporary messages, so for example “you can’t move in that direction” could be a temporary message that shows up but doesn’t stay in the message log -
[ ]automatically pick up items like in brogue -
[ ]ensure only one item is on a tile; right now you can drop multiple items on a tile, and there’s no way to choose which to pick up -
[ ]extend player vs enemies to factions so that anyone can attack anyone not in their faction -
[ ]some way to start a new game without reloading the page -
[ ]some way to delete your saved game to free up 90k of browser storage -
[ ]a scrolling map so you always see yourself in the center -
[ ]fix bug: if a monster is over the stairs, and you walk out of view, the stairs should be visible but are not -
[ ]fix bug: if you level up twice in one combat hit (such as from a fireball hitting many enemies), you only get to upgrade attributes once -
[ ]change the x,y location system to have x,y,z, and then have stairs that go back up so everything on previous levels is preserved -
[ ]have monsters do something on their own -
[ ]have corpses decay after some time -
[ ]have monsters drop loot -
[ ]try changing to a wasd+e+f scheme to see how that feels